| Re: April Fewells Figurine Progression |
Subject: Re: April Fewells Figurine Progression
by co_04 on 2010/11/26 21:33:25
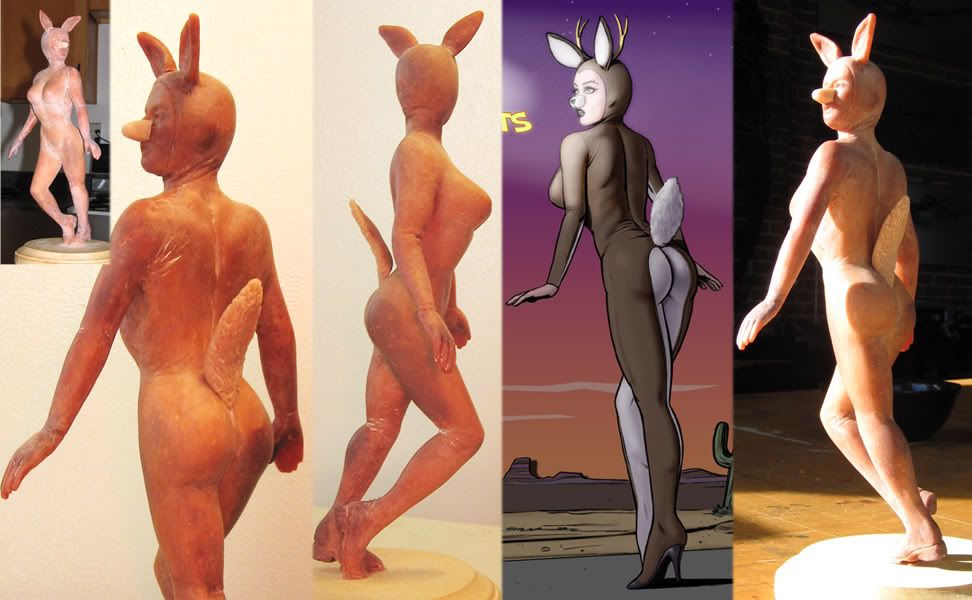
Okay, this is the last part of this stage, the modeling. Although the detail is pretty good (despite the photography) you can achieve greater detail in the subsequent wax stage. Several lessons I learned along the way so far:
1) The armature. The armature should be wrapped in wire, not foil. Foil is fine on the broader areas such as the body but then should be covered with a two-part epoxy putty. This keeps things from moving around (like arms). Wire should be wrapped around the appendages for greater stability and adhesion when the clay is applied. The foil-wrapped arms and legs proved to be too unstable.
2) The pose. I thought this would be an easier pose to work with, but in reality it turned out to be more problematic than anticipated. Because of its natural center of gravity, combined with the gage of the armature wire + weight of the clay, the figure had a tendency to fall forward. A much better solution would have been to use one of the pinups that incorporates a support, such as "April's Le Tout Boo-lesque" (gravestone).
3) Smoothing the surface. I didn't find this out till later, but you should smooth down the clay with turpentine. Although the surfaces are pretty good, this would have been useful information to have. Since I intend to recast the figure in wax, all this plus final corrections can be made in the wax stage.
4) Letting the clay get dirty. I didn't bother to cover the figure between work times so the clay had a tendency to discolor. This was apparent when adding fresh clay. That's why you see so much uneven color in the surface--not that it mattered in this case anyway, because I made the mistake of over baking the clay.
5) Over baking. I think I over cooked the thing by about 10 minutes. Not really a big deal, but it would have been nice to have the original color throughout. You can tell the difference with the tail and the nose, which are separate pieces that were baked more attentively.
Despite these issues, I was rather pleased the results. Anatomically my only concern may be that the head is a tad large, though ironically the legs tend to look a little short in the photos. Next I will add the costume seams by gluing on thread, and any other details that were impossible to add in the modeling stage. Then either recast in wax for final cleanup and detail, and finally to a master for multiple castings...or maybe just go on to another figure. 
|
|