OK here it goes, the main reason I normally don't do Art notes is that I am too damn wordy and long-winded. (It?s true)
You can find the full sized version of this image
http://www.comicbookfanart.com/uploads/photos3/2.jpg , Please enjoy as The image really got a kick in the pants trying to get it down to 90k.
I spent more time on this image then I have any image in the past. When I joined the contest I wanted to do something I had never done before, an entirely different kind of art. I have had poser for quite sometime in the past I only used poser to create body parts for frankensteining or for basic nude base models that I later manipped heavily in Photoshop but the majority of the image was done in Photoshop as a manip rather then a 3d image. I decided that I was going to do something I had never done before and create the picture in a way I had never done. Since I barely knew how to do more then load poser, I started with learning the program. I started small. I went to renderosity and Daz 3d as well as talking to
Cyanure@heromorph and read some tutorials on simple things like applying a skin to model. My first image in the training for this image was this
http://heromorph.com/heromorph2/modules/myalbum/photo.php?lid=6986 it was my first time uses morphs and applying a skin to a model in poser.
Dan started giving us clues as to what we had to do for round one at this point, Around the second clue, Dan kind of gave it away when he gave us absorbing mans alias Rocky Davis, One google search later and I knew who I was going to be doing. The only problem was How the Heck is Absorbing man, and is that who Nick Nolte was in the Hulk movie? I mean come on who the hell is this guy. Thanks be for google, after a couple searches I knew some history and had some reference images.
After looking at what I had for poser and what I would need, I decided to purchase a platinum membership for Daz3d and as well as a whole butt lot of things from there store.
Next I started to work on learning camera angles and lighting, I did a large number of images for that, one thing I noticed about most 3d artists is that they use boring camera angles, rather then dynamic ones. I made the following images based solely for the purpose of learning these things.
http://heromorph.com/heromorph2/modules/myalbum/photo.php?lid=6985 ,
http://heromorph.com/heromorph2/modules/myalbum/photo.php?lid=7003 ,
http://heromorph.com/heromorph2/modules/myalbum/photo.php?lid=7006 ,
http://heromorph.com/heromorph2/modules/myalbum/photo.php?lid=7009 ,
http://heromorph.com/heromorph2/modules/myalbum/photo.php?lid=7013 ,
http://heromorph.com/heromorph2/modules/myalbum/photo.php?lid=7014 ,
http://heromorph.com/heromorph2/modules/myalbum/photo.php?lid=7025 After doing these pictures and getting feed back I decided to move on in my learning. The Next step for what I wanted to do was custom Skins for models as I knew I would need some for the final picture you see above. So I started small, I took the skin I used for the first image I did and brought into Photoshop both the head skin, body skin, and hair skin and manipped them like I would in a photomanip then applied my new skin to a model to create this image.
http://heromorph.com/heromorph2/modules/myalbum/photo.php?lid=7030 , the skin worked out pretty good so next I used the same method for clothing. It didn't turn out so well.
http://heromorph.com/heromorph2/modules/myalbum/photo.php?lid=7103 this image was my custom clothing skin test.
I started feeling pretty comfortable with poser at this point so I decided to start to work on everything I learned and create some more fluid and graceful flow to the images. This image
http://heromorph.com/heromorph2/modules/myalbum/photo.php?lid=7122 was a test to see if I could get that sense in an image as was this
http://heromorph.com/heromorph2/modules/myalbum/photo.php?lid=7124. I did a few more practice images that used everything I had learned up to this point and then decided I was ready to move on in my training. The next step for me was taking my knowledge of Photoshop and using it to enhance my new poser skills. Post work, up to this Point I had not done post work on my poser images. So I did this image
http://heromorph.com/heromorph2/modules/myalbum/photo.php?lid=7209 this image was done for the sole purpose of enhancing a render in Photoshop to see how much an image could be improved with out actually manipping it. Just minor fixes and tweaks. Lighting changes etc..
Along the way I had started working on the Planning portion of the image. I did a few rough sketches of what kind of image I wanted to do. After about 10 -15 different ideas I went over with my wife, I finally settled on one.
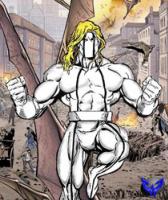
I started the image with Absorbing Man; I used the Freak as the model for him. I started by making a customize skin for the character. I spent about six hours making it in Photoshop and did a few test renders. It was pretty good but then I decided to scrap it and start again.
I had decided to change the image plan and instead of fighting Thor as I figured most people would have him fighting, I would have him fight different Hero's. My research into Absorbing man (I knew nothing about this character) showed me that he had many run-ins with Spiderman. One of Spiderman's close Allies is Daredevil (at least he was last time I read a Spiderman comic) So I wanted him in the picture as well.
So with a new image plan, I started creating the morphs and pose for absorbing man, as well as arming him and dressing him. Finding a ball and chain was impossible for poser. I found a wrecking ball in some of the products but it did not have a chain. After a lot of searching, I found a chain; it had shackles at one end and a wall at the other. I made the wall and shackle transparent and posed the chain and placed the ball at the end and the freak at the other. Since each one was a separate figure, it took me quite awhile to get the pose right from every possible angle, as I had not decided what the camera angle was going to be at this point. I then added in the pipe for his other hand. I then found some pants and boots for absorbing man. After finding the pants I made a customize skin for the pants model, making them look like his prison/referee pants he wears most of the time. Then I started on the skin for the freak himself. As a base image I used a skin I got from Daz and combined the skin from the pipe, the chain and the ball in Photoshop to create the effect of absorbing man using his powers and become the same materials that he was touching.
I then found the broken pillar and placed it into the scene. The main pillar was 2 models that were used, one for the top and one for the bottom.
Spiderman was next; I originally used a Spiderman model that I downloaded. Once I put him in place and did a test render I realized he looked very very low res compared to the rest of the image and models. So I scrapped that and used a nude Mike 3 model. I put in the body morphs and adjusted the size of him and put the pose him, and left him like that until the Photoshop phase of the image. At this point my wife would continuously tease me about the digital man butt that was on the screen all the time.
Daredevil was next portion of the puzzle. The poser section of his image was fairly easy. I used David 3 as the base. I applied some body and face morphs as well as a skin to him (I used a skin as part of his face would be showing when I finished), I also added in the millennium horns and morphs to the character. I left the Daredevil model nude, as I wanted to manip him using my standard maniping techniques as I was going to do with Spiderman. Unfortunately due to the image plan, the teasing about digital man butt intensified.
I moved onto the creation of the background. I went thru several poser backgrounds before settling on the one in the final picture. For a long time, I had a completely different cityscape. But after a lot of moving the models around and adjustments, as well as trying a number of camera angles and various background pieces and parts. I finally got the background that I wanted. I then had to google a large enough picture of the sky. Once I had a pretty good image. It was a little flat. I loaded the image into Photoshop made some adjustments to the perspective and flipped it and then cropped it to the right size saved it and then placed the sky image as a background image in poser so all the models would render in front of it. I then added in some lights to give the scene better lighting and make it look like the daytime.
Next I tried to populate the city with traffic and other things. Due to a lack of memory or a decent 3d card, I had to go about this in a smart way; I saved the scene with the three main characters and rendered it. Then I removed the characters and models in the foreground because I had to do a render for each item in the background. So I would put a driver in each vehicle pose them and dress them place the car and driver on the street render, save the image and then delete the models from the scene and move on to the next part. I did renders this way for 6 more cars as well as Cinderella?s carriage (it is hiding behind daredevil, not visible), some littler, cans garbage cans, a Harley, spare tires. Crates. Some birds. A helicopter, a cat and 2 people running, (The second person is behind Absorbing man and is not visible either) I one person that tripped (she is behind the pillar and Bike) I also made one render of the cityscape with nothing on it. I then opened up each image in Photoshop. With the back cityscape image as the background first layer. I loaded up all the other background layers over top and created layer masks removing the parts of the each image that had their background element in it. As things got moved around and the parts started to come together, I became apparent that not all of the things I put into the background would even be visible. Once I was done this step. I loaded up the image with the pillar, Absorbing man, Spidey and dd; again I give this layer a layer mask so that only the necessary parts were exposed. I then merged all the layers.
Now the maniping part of the story comes into effect. I started with Daredevil. I used the pen tool and selected his entire body and made a new layer for it. Then started to manip. I used my standard maniping techniques on daredevil, nothing overly fancy, the normal create suit, add wrinkles, highlights slight texture etc.. Except for the boots. I went back into poser and rendered up some boots for him. Due to the morphs I had on the body I had to really reshape and mold them in Photoshop to get them to fit. So they are probably half rendered and half panted as well as recolored in Photoshop. I also made his Billy club from scratch in Photoshop.
Spiderman was next to be manipped. Very similar to DD. The basic part of the suit the red and blue were nothing special to manip. But then came the webbing on the costume. I drew each line with the pen tool individually and then stroked the pen tool with a 1 pixel solid black brush. I the parented the web layers to the various red layers. It took quite a bit of time. I did all of Spiderman?s body, even some parts that cannot be seen as at this point did not know how I was going to doing the exploding brick. After I finished adding in the webbings, giving Spiderman the some highlights, I moved onto the exploding column.
When I started I had no idea how to make and exploding column I really had no idea. My first thought was the dust factor. So I tried a bunch of things in Photoshop and in about 30 min and 8 layers later, I was happy with the dust. I then painted in a bunch of rocks and debris using the clone tool on the columns for texture and lighting. Then I had a power surge when I was almost done and lost everything I had done after Spiderman and also discovered my ups battery backup needed to be replaced. One thing I hate is redoing work that was done already. So after a break, I came at it at a different angle. I went into poser and made the exploding rumble in 3d over a white background. I then went into Photoshop and made dust again this time trying a few things different and only taking 10 min and 5 layers. I extracted the rocks from the white background and put them into place in between the dust layers. I then put each rock and piece of debris onto their own layer and gave them motion blurs and trails. I then created shadows for the debris on the wrecking ball and other parts of the surrounding area.
I then moved on to general clean up. And post, I fixed up some of the render glitches and bugs in Photoshop. I didn?t really do that much as I was happy with how all the various renders had turned out.
Onto The webs!! When I started doing the web, I had no idea how to do them. Again I turned to goggle and took a look at some spider webs. Then went into Photoshop and started to paint them. After some work and a couple different versions, I finished the webs.
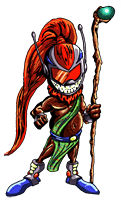
I still wasn?t done; I wanted to add in a couple of extras. For the background. Although I made a number of things a lot of the extras got left on the cutting room floor. What I ended up with were Antman and Wasp. Antman is an image of an Antman action figure I got off of google that I separated from the background, resized, placed onto the image and then applied a shadow for. Wasp was a 3d render I did of a Wasp character Model I pulled off the web. After posing and rendering her, I put her into the image, resized her etc.. Then I did some more fix ups for the image, Like blurring the helicopter Blades, etc.
So a few months, dozens of renders, over a hundred layers, lots of training and research later I came out with this image. Well that?s it. That wasn?t so bad, I am surprised I was able to be so brief.
I would like to thank a bunch of people for little being my second sets of eyes on this one, Biohaz and his Cheez Whiz, Daruma, Blu, and Jr. Thank dudes


 ! 3D Art !
 Marvel Comics


 This image made Lady Heromorph's TOP 100 Pics of 2006. Congratulations!


 Man there Hawk this really roxor ten 11111!


 Re: Challenge of the Artists: Absorb This!!